Physical Address
304 North Cardinal St.
Dorchester Center, MA 02124
Physical Address
304 North Cardinal St.
Dorchester Center, MA 02124

SSL means Secure Socket Layer which increases the security of a website and a user. Every day we fill out online forms, buy products online, and many other things we do to send our information to web servers. To protect data transfer, we need a secure connection.
That’s where the SSL Certificate provides what matters. The HTTPS connection establishes an encrypted connection between a user and a web server, so hackers do not have access to the information of a particular user.
Each site has a unique SSL Certificate that helps identify the secure connection. Any site that claims to have a secure SSL connection, HTTPS and its certificate does not match, then your browsers will give you the following warning message.
Do you want to add some additional security measures to your blogger site? Are you worried that your blogger blog will be attacked by malware? With Blogger’s free SSL certificate service, you can now protect your blogger site and visitors by adding an additional layer of security. Moving from HTTP to HTTPS and installing an SSL certificate on your blogger site is quite simple. In this article, we will show you how to enable the free HTTPS SSL certificate in Blogger.
When it comes to search engine rankings, Google places more importance on HTTPS sites than on HTTP sites. Having a secure connection gives a stronger message to the search engine that gives importance to the security of your site.
This is why sites that have a secure connection may work a little better than other sites that do not have a secure SSL connection.
Approximately, a basic SSL certificate costs about $ 10 / year for each site. Fortunately, Blogger offers a free SSL solution to its blogger users. Also, blogs with custom domains that are compatible with this feature have free SSL certificates.
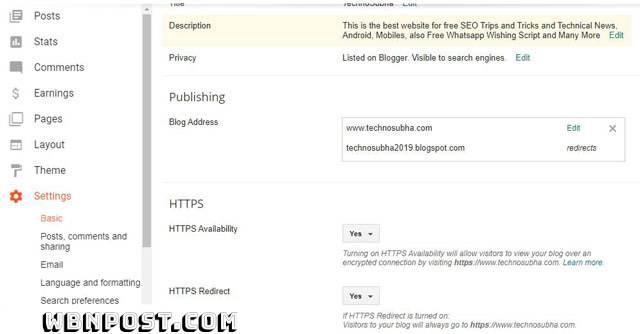
To enable HTTPS, log in to Blogger and select a blog where you want to enable HTTPS.

- Go to Settings >> Basics >> HTTPS Settings.
- In HTTPS Availability, select YES

Now your blog has a unique SSL certificate that will provide an additional layer of security to your site. Now go and open your site with https: // and enjoy free SSL support from a blogger. You can add SSL support to all your blogger blogs for FREE.
Now successfully enable the SSL certificate in your blog. Now you need to tell Google and other search engines that they have migrated your blog to https. Therefore, this step will help you make your blog more SEO-friendly and improve your search engine ranking. So let’s do this.
The first thing you need to update your robots.txt blog is to replace HTTP with https in the sitemap links and save. You should now resubmit your blog and the https version of the site map to the Google search console as well.
- Sign in to your Google Search Console account
- Add new property this way: https://www.yourblog.com
- After that adding the new property and verifying it,
- Then also send the site map of your HTTPS blog to the Google webmaster console.
We hope this tutorial has helped you learn how to add a free SSL HTTPS certificate in Blogger. If you like this article, share it with your friends.